The Cherno的OpenGL系列教程
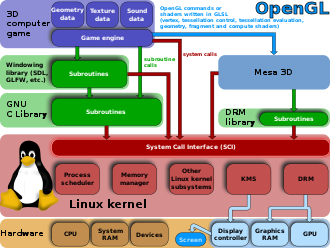
欢迎来到OpenGL OpenGL(Open Graphic Libraries)是什么?一种图形API,并且允许我们访问GPU,本质是一种规范,并没有统一的实现,具体的函数实现在你使用的操作系统的显卡驱动上。
OpenGL功能图:
下面介绍GLFW、GLEW、GLAD:
GLFW就是提供一个初始化、管理OpenGL窗口的库,因为OpenGL本质上不提供这些功能。require a window , due to OpenGL not providing any mechanisms for creating the necessary contexts, managing windows, user input, timing, etc.GLFW is not a user-interface library,platform-specific library, image-loading library or a threading library. Additionally, it cannot render independently or playback sound.
GLEW其实就是帮你在你的显卡驱动上找到显卡厂商实现的OpenGL的函数determining which OpenGL extensions are supported on the target platform. OpenGL core and extension functionality is exposed in a single header file. GLEW has been tested on a variety of operating systems, including Windows, Linux, Mac OS X, FreeBSD, Irix, and Solaris.
GLAD和GLEW差不多。
设置OpenGL和在C++中创建一个窗口 GLFW是配合OpenGL使用的轻量级工具库,全称 Graphics Library Framework(图形库框架)
我们会开始使用GLFW库写一个能显示一个三角形的窗口。
创建项目
添加依赖库:首先我们需要从官网下载GLFW库 的编译后文件(也可以下载源代码自己编译),本文下载的是glfw-3.3.8.bin.WIN32版本的。然后将包中的lib-vc2022(库文件,本节只使用了静态库)和include(头文件)复制到自己的项目文件夹下的dependences(自己创建)文件夹下。
VS2022设置:
你需要在项目设置 - C/C++ - 常规 - 附加包含目录中添加(就是找到依赖库的头文件) $(SolutionDir)Dependences\GLFW\include;
在项目设置 - 链接器 - 常规 - 附加包含目录中添加$(SolutionDir)Dependences\GLFW\lib-vc2022;
在项目设置 - 链接器 - 输入 - 附加依赖项中添加glfw3.lib;opengl32.lib;User32.lib;Gdi32.lib;Shell32.lib(此项可以保留VS的原设置,这里只是为了说明哪些库在工作);
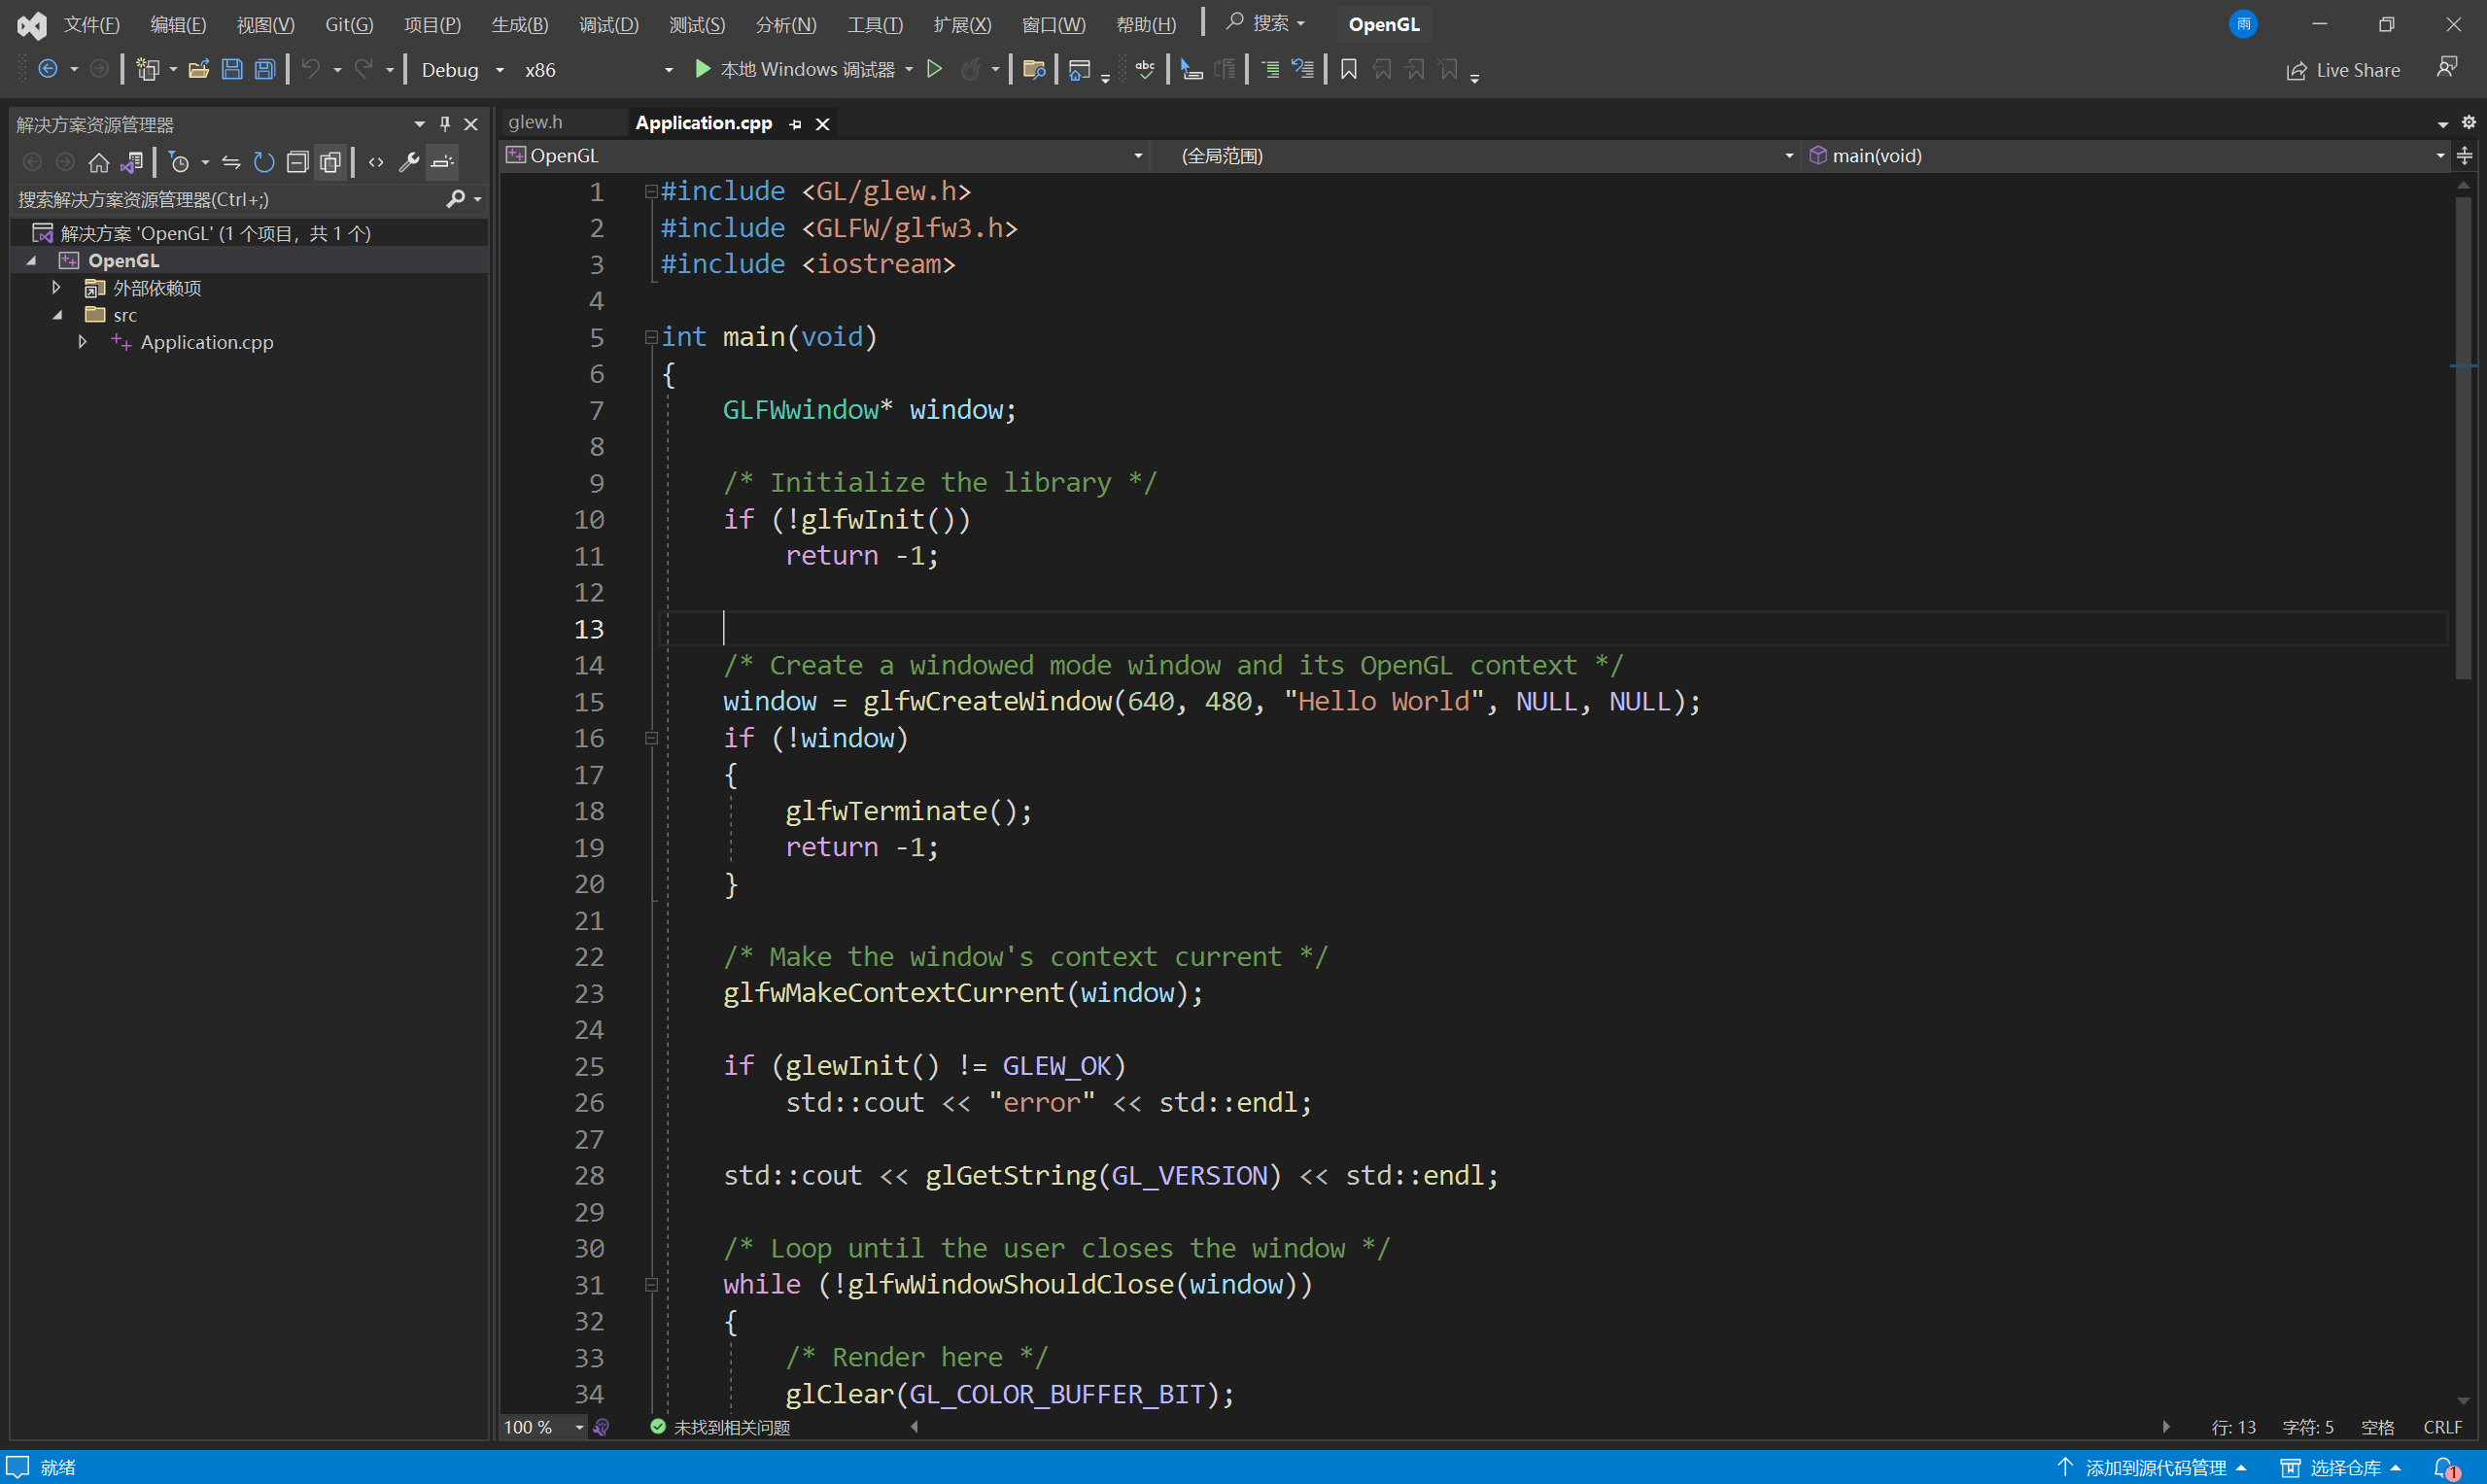
复制GLFW官网的窗口示例代码 到你的Application.cpp文件中,并修改使其能显示三角形。
1 2 3 4 5 6 7 8 9 10 11 12 13 14 15 16 17 18 19 20 21 22 23 24 25 26 27 28 29 30 31 32 33 34 35 36 37 38 39 40 41 42 43 44 #include <GLFW/glfw3.h> int main (void ) GLFWwindow* window; if (!glfwInit ()) return -1 ; window = glfwCreateWindow (640 , 480 , "Hello World" , NULL , NULL ); if (!window) { glfwTerminate (); return -1 ; } glfwMakeContextCurrent (window); while (!glfwWindowShouldClose (window)) { glClear (GL_COLOR_BUFFER_BIT); glBegin (GL_TRIANGLES); glVertex2f (-0.5f , -0.5f ); glVertex2f ( 0.0f , 0.5f ); glVertex2f ( 0.5f , -0.5f ); glEnd (); glfwSwapBuffers (window); glfwPollEvents (); } glfwTerminate (); return 0 ; }
如果你在运行时出现了依赖库的link错误问题,比如(在输出列表中查看):
1>glfw3.lib(win32_monitor.obj) : error LNK2019: 无法解析的外部符号 __imp__CreateDCW@16,函数 __glfwPlatformGetGammaRamp 中引用了该符号
你可以去Google”CreateDCW”,你会在微软的文档中发现这个函数属于哪个库?Gdi32.lib,然后将库名添加到链接的附加依赖项中。
在C++中使用现代OpenGL 目标: 在GLFW创建窗口后初始化GLEW
我们同样需要在GLEW网站上下载,然后在项目中设置引用库,如同上一节一样的设置。
设置好之后仍然会有链接问题,因为还有一个细节,你会在glew.h文件中发现:由于没有定义GLEW_STATIC字符,编译器会默认加载动态链接库而不是静态的,本节使用的是静态链接库,所以你需要 项目属性 - C/C++ - 预处理器定义 中添加 GLEW_STATIC
1 2 3 4 5 6 7 8 9 10 11 12 13 14 15 #include <GL/glew.h> #include <GLFW/glfw3.h> #include <iostream> glfwMakeContextCurrent (window); if (glewInit () != GLEW_OK) std::cout << "error" << std::endl; std::cout << glGetString (GL_VERSION) << std::endl;
使用现代OpenGL画一个三角形 上节我们在GLFW提供的窗口中,用比较传统的方式画了一个三角形,本节,我们将使用现代的OpenGL方法实现同样的目标。
先介绍一些概念
选择缓冲区、着色器并绘图是一个状态,这就是OpenGL的原理,它是一个状态机。
删除原先在循环内的三角形代码,并在循环外加入以下代码:
1
2
3
4
5
6
7
8
9
10
11
12
float positions[6 ] = { -0.5f , -0.5f , 0.0f , 0.5f , 0.5f , -0.5f }; unsigned int buffer;glGenBuffers (1 ,&buffer); glBindBuffer (GL_ARRAY_BUFFER,buffer);glBufferData (GL_ARRAY_BUFFER, 6 *sizeof (float ),positions,GL_STATIC_DRAW); glEnableVertexAttribArray (0 );glVertexAttribPointer (0 , 2 , GL_FLOAT, GL_FALSE, sizeof (float ) * 2 , 0 );
要学会RTFM(Read the fucking manual),例如访问OpenGL文档 页面查看glVertexAttribPointer函数的作用。该函数起到调用顶点属性的作用。
1
2
3
4
5
6
void glVertexAttribPointer ( GLuint index, GLint size, GLenum type, GLboolean normalized, GLsizei stride, const GLvoid * pointer)
OpenGL的着色器原理 上节我们画了一个三角形,但是并没有写着色器(shader),代码却执行成功了,这是因为显卡驱动默认为我提供了一个着色器。
显卡要如何处理我们发送给它的数据?这就是着色器存在的原因
对于大多数图形编程来说有:顶点着色器、片段着色器(又称为像素着色器)等等着色器。这些着色器在实际执行DrawCall指令并在屏幕上绘制的过程叫“渲染管道”,简化的说DrawCall会先调用顶点着色器(我们有三个顶点,会调用三次,决定了每个顶点的位置),然后经过一些过程,在调用像素着色器(会将每个需要光栅化的像素运行一次,决定了每个像素的状态),然后还有一些过程把图画出来。
值得注意的是,要注意像素着色器会为每个需要渲染的像素执行一次,可能会代价很大。
在OpenGL中写一个着色器 目标:实现是一个着色器,并从文件中读取着色数据,正确显示
逻辑图:
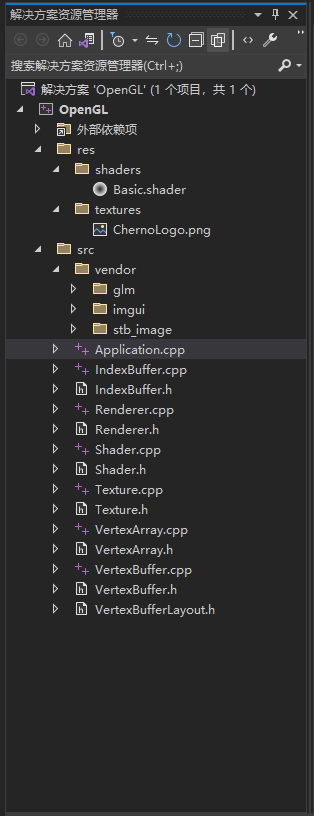
在res目录下创建shaders文件,并在内创建basic.shader文件,具体内容如下:
1
2
3
4
5
6
7
8
9
10
11
12
13
14
15
16
17
18
19
#shader vertex #version 330 core layout (location = 0 ) in vec4 position;void main () gl_Position = position; }; #shader fragment #version 330 core layout (location = 0 ) out vec4 color;void main () color = vec4 (0.2 , 0.3 , 0.8 , 1.0 ); };
代码实现:
1 2 3 4 5 6 7 8 9 10 11 12 13 14 15 16 17 18 19 20 21 22 23 24 25 26 27 28 29 30 31 32 33 34 35 36 37 38 39 40 41 42 43 44 45 46 47 48 49 50 51 52 53 54 55 56 57 58 59 60 61 62 63 64 65 66 67 68 69 70 71 72 73 74 75 76 77 78 79 80 81 82 83 84 85 86 87 88 89 90 91 92 93 94 95 96 97 98 99 100 101 102 103 104 105 106 107 108 109 110 111 112 113 114 115 116 117 118 119 120 121 122 123 124 125 126 127 128 129 130 131 132 133 134 135 136 137 138 139 140 141 142 143 144 145 146 147 148 149 150 151 152 153 #include <GL/glew.h> #include <GLFW/glfw3.h> #include <iostream> #include <fstream> #include <string> #include <sstream> struct ShaderProgramSource { std::string VertexSource; std::string FragmentSource; }; static ShaderProgramSource ParseShader (const std::string& filepath) std::ifstream stream (filepath) ; enum class ShaderType { NONE = -1 , VERTEX = 0 , FRAGMENT = 1 }; std::string line; std::stringstream ss[2 ]; ShaderType type = ShaderType::NONE; while (getline (stream, line)) { if (line.find ("#shader" ) != std::string::npos) { if (line.find ("vertex" ) != std::string::npos) type = ShaderType::VERTEX; else if (line.find ("fragment" ) != std::string::npos) type = ShaderType::FRAGMENT; } else { ss[(int )type] << line << '\n' ; } } return { ss[0 ].str (),ss[1 ].str () }; } static unsigned int CompileShader (unsigned int type, const std::string& source) unsigned int id = glCreateShader (type); const char * src = source.c_str (); glShaderSource (id,1 ,&src,nullptr ); glCompileShader (id); int result; glGetShaderiv (id, GL_COMPILE_STATUS, &result); if (result == GL_FALSE) { int length; glGetShaderiv (id, GL_INFO_LOG_LENGTH, &length); char * message = (char *)alloca (length * sizeof (char )); glGetShaderInfoLog (id, length, &length, message); std::cout << "Failed to compile" << (type == GL_VERTEX_SHADER ? "vertex" : "fragment" ) << " shader!" << std::endl; std::cout << message << std::endl; glDeleteShader (id); return 0 ; } return id; } static unsigned int CreateShader (const std::string& vertexShader, const std::string& fragmentShader) unsigned int program = glCreateProgram (); unsigned int vs = CompileShader (GL_VERTEX_SHADER, vertexShader); unsigned int fs = CompileShader (GL_FRAGMENT_SHADER, fragmentShader); glAttachShader (program, vs); glAttachShader (program, fs); glLinkProgram (program); glValidateProgram (program); glDeleteShader (vs); glDeleteShader (fs); return program; } int main (void ) GLFWwindow* window; if (!glfwInit ()) return -1 ; window = glfwCreateWindow (640 , 480 , "Hello World" , NULL , NULL ); if (!window) { glfwTerminate (); return -1 ; } glfwMakeContextCurrent (window); if (glewInit () != GLEW_OK) std::cout << "error" << std::endl; std::cout << glGetString (GL_VERSION) << std::endl; float positions[6 ] = { -0.5f , -0.5f , 0.0f , 0.5f , 0.5f , -0.5f }; unsigned int buffer; glGenBuffers (1 ,&buffer); glBindBuffer (GL_ARRAY_BUFFER,buffer); glBufferData (GL_ARRAY_BUFFER, 6 *sizeof (float ),positions,GL_STATIC_DRAW); glEnableVertexAttribArray (0 ); glVertexAttribPointer (0 , 2 , GL_FLOAT, GL_FALSE, sizeof (float ) * 2 , 0 ); ShaderProgramSource source = ParseShader ("res/shaders/Basic.shader" ); unsigned int shader = CreateShader (source.VertexSource, source.FragmentSource); glUseProgram (shader); while (!glfwWindowShouldClose (window)) { glClear (GL_COLOR_BUFFER_BIT); glDrawArrays (GL_TRIANGLES,0 ,3 ); glfwSwapBuffers (window); glfwPollEvents (); } glDeleteProgram (shader); glfwTerminate (); return 0 ; }
在OpenGL中的索引缓冲区 前面的代码实现的效果是画了一个三角形?如果想利用上面的代码画一个正方形,那么我们需要把两个等腰直角三角形拼接成一个正方形。当然这不一定是画正方形的最好办法,只是为了说明画两个三角形表示一个正方形的办法,会有两个顶点的冗余重复,如果图形过多、过复杂这种现象会造成严重的内存资源浪费。为了解决这个问题,我们需要索引缓冲区。
1 2 3 4 5 6 7 8 9 10 11 12 13 14 15 16 17 18 19 20 21 22 23 24 25 26 27 float positions[] = { -0.5f , -0.5f , 0.5f , -0.5f , 0.5f , 0.5f , -0.5f , 0.5f , }; unsigned int indices[] = { 0 ,1 ,2 , 2 ,3 ,0 }; unsigned int buffer;glGenBuffers (1 ,&buffer);glBindBuffer (GL_ARRAY_BUFFER,buffer);glBufferData (GL_ARRAY_BUFFER, 4 * 2 * sizeof (float ),positions,GL_STATIC_DRAW);glEnableVertexAttribArray (0 );glVertexAttribPointer (0 , 2 , GL_FLOAT, GL_FALSE, sizeof (float ) * 2 , 0 );unsigned int ibo;glGenBuffers (1 , &ibo);glBindBuffer (GL_ELEMENT_ARRAY_BUFFER, ibo);glBufferData (GL_ELEMENT_ARRAY_BUFFER, 6 * sizeof (unsigned int ), indices,GL_STATIC_DRAW);
循环窗口中:
1 glDrawElements (GL_TRIANGLES, 6 , GL_UNSIGNED_INT, nullptr );
如何在OpenGL中处理错误 OpenGL有两种错误信息函数glDebugMessageCallback() glGetError()
我们在这里使用第二种函数:
1 2 3 4 5 6 7 8 9 10 11 12 13 14 15 16 17 18 19 20 21 22 23 24 25 26 27 28 29 30 31 #include <GL/glew.h> #include <GLFW/glfw3.h> #include <iostream> #include <fstream> #include <string> #include <sstream> #define ASSERT(x) if (!(x)) __debugbreak(); #define GLCall(x) GLClearError();\ x;\ ASSERT(GLLogCall(#x,__FILE__,__LINE__)); static void GLClearError () while (glGetError () != GL_NO_ERROR); } static bool GLLogCall (const char * function, const char * file, int line) while (GLenum error = glGetError ()) { std::cout << "[OpenGL Error] (" << error << ") " << function << " " << file << ":" << line << std::endl; return false ; } return true ; } GLCall (glDrawElements (GL_TRIANGLES, 6 , GL_UNSIGNED_INT, nullptr ));
我们可以用这种方法测试诸多语句
OpenGL统一变量 修改basic.shader文件
1
2
3
4
5
6
7
8
9
10
11
12
13
14
15
16
17
18
19
20
21
#shader vertex #version 330 core layout (location = 0 ) in vec4 position;void main () gl_Position = position; }; #shader fragment #version 330 core layout (location = 0 ) out vec4 color;uniform vec4 u_Color; void main () color = u_Color; };
主文件中
1
2
3
4
5
6
7
8
9
10
11
12
13
14
15
16
17
18
19
20
21
22
23
24
25
26
27
28
29
30
31
32
unsigned int shader = CreateShader (source.VertexSource, source.FragmentSource);GLCall (glUseProgram (shader));GLCall (int location = glGetUniformLocation (shader,"u_Color" ));ASSERT (location != -1 );GLCall (glUniform4f (location, 0.8f , 0.3f , 0.8f , 1.0f ));float r = 0.0f ;float increment = 0.05f ;while (!glfwWindowShouldClose (window)){ GLCall (glClear (GL_COLOR_BUFFER_BIT)); GLCall (glUniform4f (location, r, 0.3f , 0.8f , 1.0f )); GLCall (glDrawElements (GL_TRIANGLES, 6 , GL_UNSIGNED_INT, nullptr )); if (r > 1.0f ) increment = -0.05f ; else if (r < 0.0f ) increment = 0.05f ; r += increment; glfwSwapBuffers (window); glfwPollEvents (); }
将前面的代码抽象成类 前面的代码都是简单的流程化的任务实现演示,让我们将这些功能抽象成类,使我们的代码更加工业化。
OpenGL纹理 我们尝试把一个PNG图片当做纹理加载出来(只是示例,游戏引擎中一般有自己的纹理文件格式)
使用了stb_imgae.h
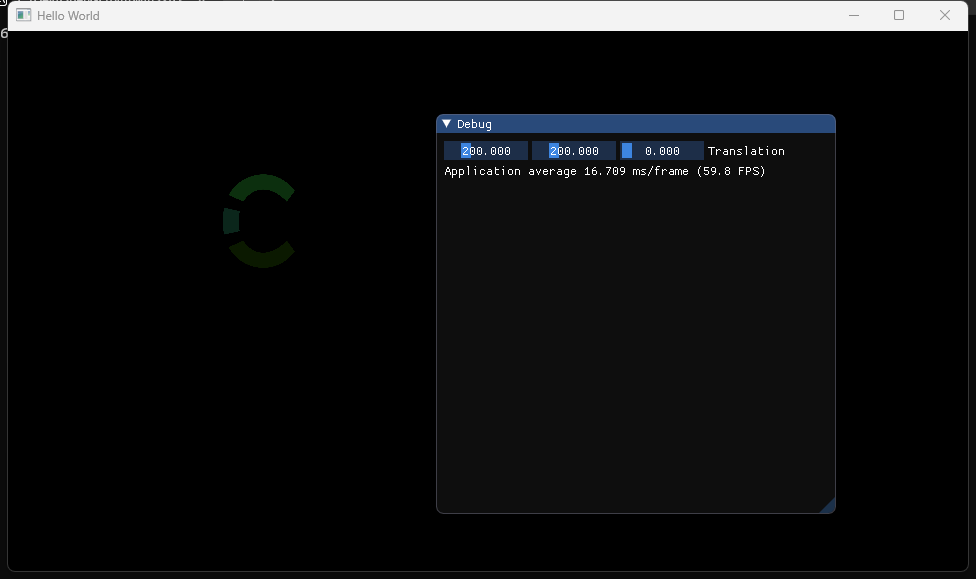
OpenGL中的数学 我们要通过glm数学库解决4:3图标的问题
OpenGL 使用imGUI控件 ImGUI:Dear ImGui is a bloat-free graphical user interface library for C++.
代码 ——————